今日作业
| # Day06 作业布置 | |
| ## 一. 完成课堂所有的代码 | |
| ## 二. 写出盒子模型包含的内容以及如何设置 | |
| ## 三. 说说你对margin的传递和折叠的理解 | |
| ## 四. 行内非替换元素在设置padding/border的上下时,有什么特殊的地方? | |
| ## 五. 整理box-sizing的作用,以及content-box和border-box的区别 | |
| ## 六. 说出元素水平居中的方案以及对应的场景 | |
| ## 七. 练习background-position和background-size(为精灵图做准备) | |
| ## 八. 找出三个盒子模型的综合案例进行练习 |
Day05作业布置
一. 写出案例,证明CSS属性的继承性
当给父元素div(类名为box)设置font-size,color,text-align这些属性时,由于这些属性具有继承性,所以该父元素下的所有子元素(p,span,div)都会默认继承这些属性
| <html lang="en"> | |
| <head> | |
| <meta charset="UTF-8" /> | |
| <meta http-equiv="X-UA-Compatible" content="IE=edge" /> | |
| <meta name="viewport" content="width=device-width, initial-scale=1.0" /> | |
| <title>Document</title> | |
| <style> | |
| .box { | |
| /* 如果给某一个元素设置了某个CSS属性,而且这个属性具有继承性,那么该元素的所有子元素会默认继承属性 */ | |
| /* 一般和文本或者字体相关的很多属性都具备继承 */ | |
| width: 400px; | |
| height: 400px; | |
| font-size: 30px; | |
| color: green; | |
| text-align: center; | |
| background-color: pink; | |
| } | |
| </style> | |
| </head> | |
| <body> | |
| <div class="box"> | |
| <div class="one">鹅鹅鹅<span>床前明月光</span></div> | |
| <p>我是p元素</p> | |
| </div> | |
| </body> | |
| </html> |
二. 写出案例,证明CSS属性的层叠性
一个CSS属性可以多次设置:
判断一: 权重, 优先级;
判断二: 先后顺序;
| <html lang="en"> | |
| <head> | |
| <meta charset="UTF-8" /> | |
| <meta http-equiv="X-UA-Compatible" content="IE=edge" /> | |
| <meta name="viewport" content="width=device-width, initial-scale=1.0" /> | |
| <title>Document</title> | |
| <style> | |
| /* id选择器 100 */ | |
| #first { | |
| color: green; | |
| } | |
| /* 元素选择器 :1 */ | |
| div { | |
| color: red; | |
| } | |
| /* 类选择器10 */ | |
| .one { | |
| color: blue; | |
| } | |
| /* 类选择器10 */ | |
| .two { | |
| color: orange; | |
| } | |
| </style> | |
| </head> | |
| <body> | |
| <div class="one two" id="first">我是div元素</div> | |
| </body> | |
| </html> | |
三. 默写出display常见的值,并且说出对应的特性,并且写出测试案例
block:让元素显示为块级元素;可以让元素独占一行,可以设置宽度和高度,高度默认由内容决定
inline:让元素显示为行内级元素 ;可以和其他行内级元素在同一行,不可以设置宽度和高度,宽度和高度由内容决定
inline-block:让元素同时具备行内级、块级元素的特征 ;可以和其他行内级元素在同一行,可以设置宽度和高度,默认宽度和高度由内容决定
none:隐藏元素
| <html lang="en"> | |
| <head> | |
| <meta charset="UTF-8" /> | |
| <meta http-equiv="X-UA-Compatible" content="IE=edge" /> | |
| <meta name="viewport" content="width=device-width, initial-scale=1.0" /> | |
| <title>Document</title> | |
| <style> | |
| .one { | |
| width: 300px; | |
| height: 300px; | |
| background-color: pink; | |
| overflow: hidden; | |
| } | |
| .one span { | |
| display: block; | |
| width: 200px; | |
| height: 200px; | |
| background-color: red; | |
| margin: 10px auto; | |
| } | |
| p { | |
| display: inline; | |
| font-size: 20px; | |
| } | |
| .two::after { | |
| /* 插入方块 */ | |
| content: ""; | |
| display: inline-block; | |
| width: 10px; | |
| height: 10px; | |
| background-color: green; | |
| } | |
| .three { | |
| display: none; | |
| } | |
| </style> | |
| </head> | |
| <body> | |
| <div class="one"> | |
| <span>我要变成块级元素</span> | |
| </div> | |
| <p>我要变成行内级元素</p> | |
| <a href="#">百度一下</a> | |
| <div class="two">在元素前面用伪元素插入123</div> | |
| <div class="three">我要隐藏</div> | |
| </body> | |
| </html> | |
四. 总结元素隐藏的方法,并且说出他们的区别
display:none
- 元素不显示出来, 并且也不占据位置, 不占据任何空间
visibility:hidden
- 会占据元素应该占据的空间
rgba设置颜色,将a的值设置为0
- rgba的a设置的是alpha值, 可以设置透明度, 不影响子元素
opacity设置透明度, 设置为0
- 设置整个元素的透明度, 会影响所有的子元素
五.京东案例
| <html lang="en"> | |
| <head> | |
| <meta charset="UTF-8" /> | |
| <meta http-equiv="X-UA-Compatible" content="IE=edge" /> | |
| <meta name="viewport" content="width=device-width, initial-scale=1.0" /> | |
| <title>Document</title> | |
| <style> | |
| .box { | |
| display: flex; | |
| justify-content: space-around; | |
| align-items: center; | |
| width: 300px; | |
| height: 200px; | |
| margin: 0 auto; | |
| } | |
| .item { | |
| width: 120px; | |
| height: 50px; | |
| line-height: 50px; | |
| font-size: 20px; | |
| color: #fff; | |
| text-align: center; | |
| padding: 0 5px; | |
| border-radius: 25px; | |
| background: #e1251b; | |
| } | |
| .plus { | |
| background: #363634; | |
| color: #e5d790; | |
| } | |
| </style> | |
| </head> | |
| <body> | |
| <div class="box"> | |
| <div class="new item">新人福利</div> | |
| <div class="plus item">PLUS会员</div> | |
| </div> | |
| </body> | |
| </html> | |
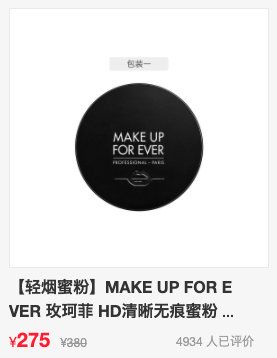
七. 进行下面的案例练习
- 可以先不做两行显示不全的…
- 可以先不做评论的靠右内容
| <html lang="en"> | |
| <head> | |
| <meta charset="UTF-8" /> | |
| <meta http-equiv="X-UA-Compatible" content="IE=edge" /> | |
| <meta name="viewport" content="width=device-width, initial-scale=1.0" /> | |
| <title>Document</title> | |
| <style> | |
| .goods { | |
| width: 400px; | |
| margin: 100px auto; | |
| padding: 10px; | |
| background-color: #f6f6f6; | |
| } | |
| .goods-img { | |
| /* width: 400px; */ | |
| height: 400px; | |
| border: 1px solid #ccc; | |
| overflow: hidden; | |
| } | |
| .goods-img img { | |
| width: 100%; | |
| } | |
| .goods-info { | |
| text-overflow: -o-ellipsis-lastline; | |
| overflow: hidden; | |
| text-overflow: ellipsis; | |
| display: -webkit-box; | |
| -webkit-line-clamp: 2; | |
| line-clamp: 2; | |
| -webkit-box-orient: vertical; | |
| margin: 8px 0; | |
| } | |
| .goods-price { | |
| display: flex; | |
| justify-content: space-between; | |
| align-items: center; | |
| height: 45px; | |
| color: #999; | |
| } | |
| .price { | |
| display: flex; | |
| align-items: flex-end; | |
| font-weight: 700; | |
| } | |
| .present-price { | |
| color: red; | |
| } | |
| .present-price span { | |
| font-size: 24px; | |
| } | |
| .origin-price span { | |
| text-decoration: line-through; | |
| } | |
| </style> | |
| </head> | |
| <body> | |
| <div class="goods"> | |
| <div class="goods-img"> | |
| <img | |
| src="https://img12.360buyimg.com/n1/jfs/t1/159701/38/9948/81556/6040d1d9E6b486d68/5829df13f7b07b58.jpg" | |
| /> | |
| </div> | |
| <h2 class="goods-info"> | |
| 【轻烟蜜粉】MAKE UP FOR EVER 玫珂菲 HD清晰无痕蜜粉 饼 6.2g(控油定妆粉饼 | |
| 补妆便携 雾面哑光) | |
| </h2> | |
| <div class="goods-price"> | |
| <div class="price"> | |
| <div class="present-price">¥<span>275</span></div> | |
| <div class="origin-price">¥<span>380</span></div> | |
| </div> | |
| <div class="comment">4934人已经评价</div> | |
| </div> | |
| </div> | |
| </body> | |
| </html> | |
务必下载!!
今日的代码和讲义 以及思维导图:【点击此链接下载 Day06.zip】
大纲
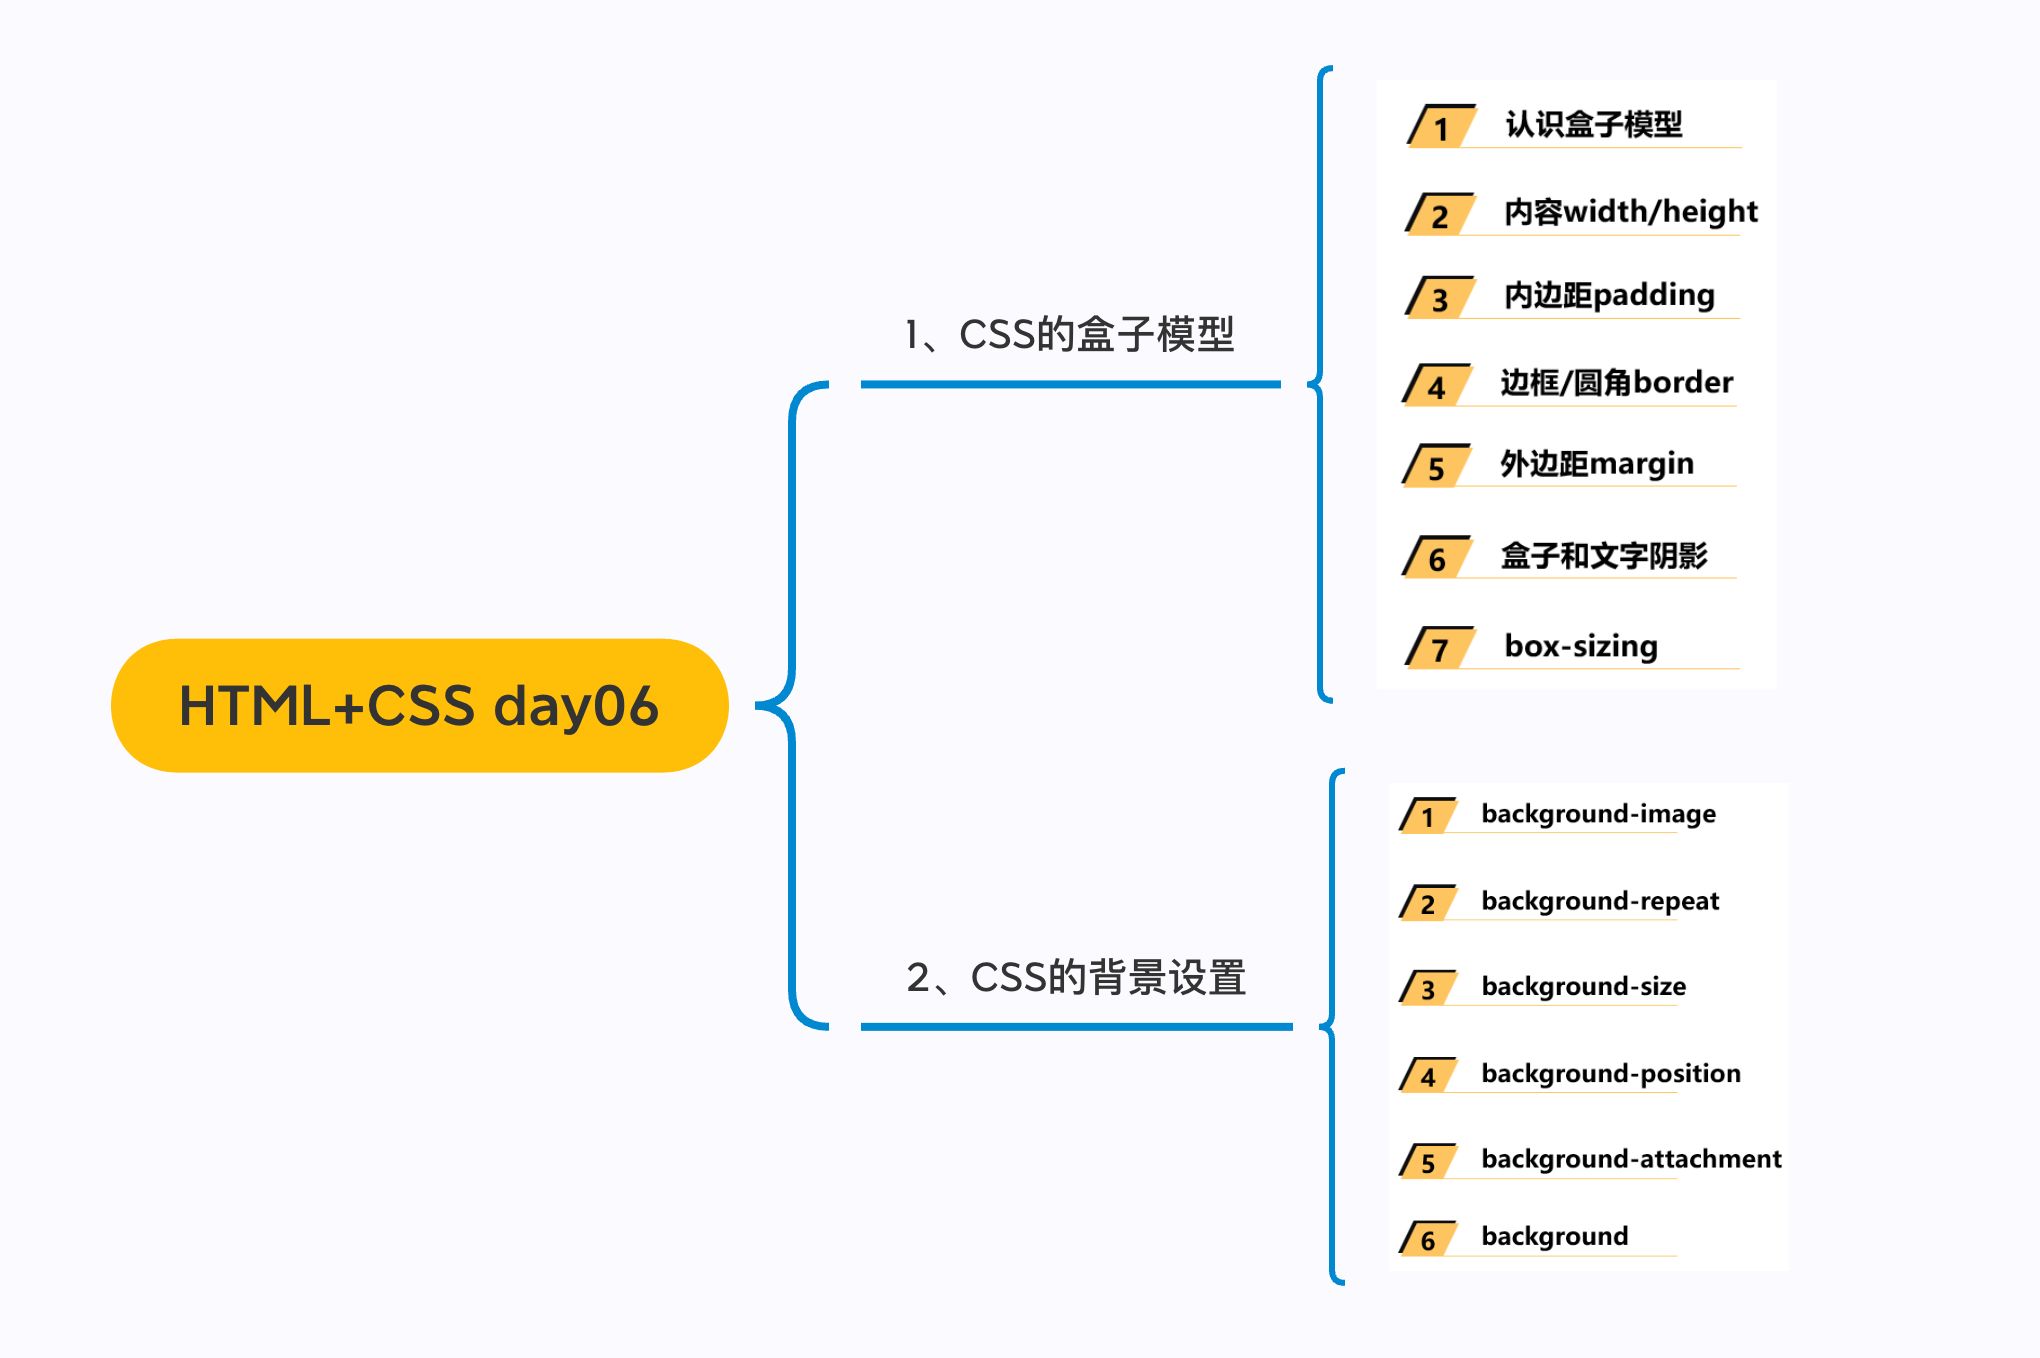
一. 盒子模型
1.1. margin
| * margin的设置问题 | |
| * top/right/bottom/left | |
| * margin和padding的选择 | |
| * margin的传递和折叠 | |
| * 父子的传递 | |
| * 兄弟的折叠 | |
| * margin进行水平居中 | |
| * 0 auto; |
外边距 - margin
margin属性用于设置盒子的外边距,通常用于元素和元素之间的间距;margin包括四个方向,所以有如下的取值:margin-top:上内边距margin-right:右内边距margin-bottom:下内边距margin-left:左内边距
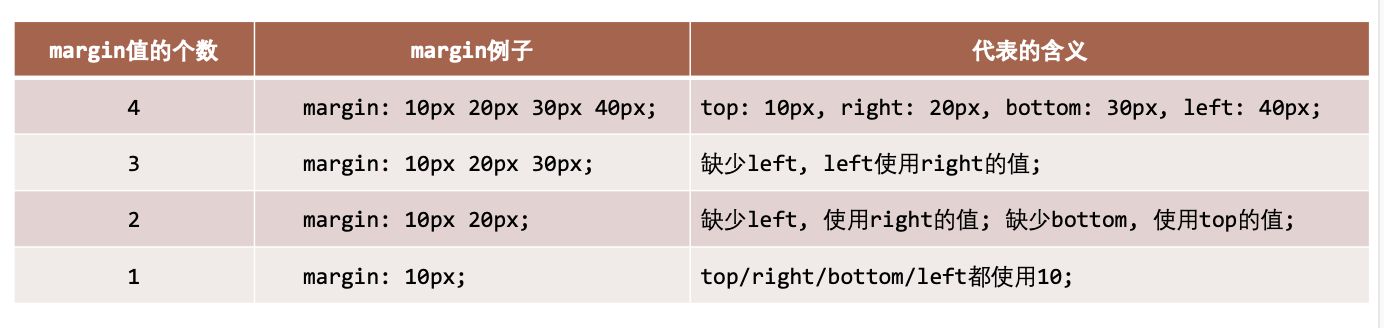
margin单独编写是一个缩写属性:margin-top、margin-right、margin-bottom、margin-left的简写属性margin缩写属性是从零点钟方向开始, 沿着顺时针转动的, 也就是上右下左;
margin也并非必须是四个值, 也可以有其他值;
margin 的其他值
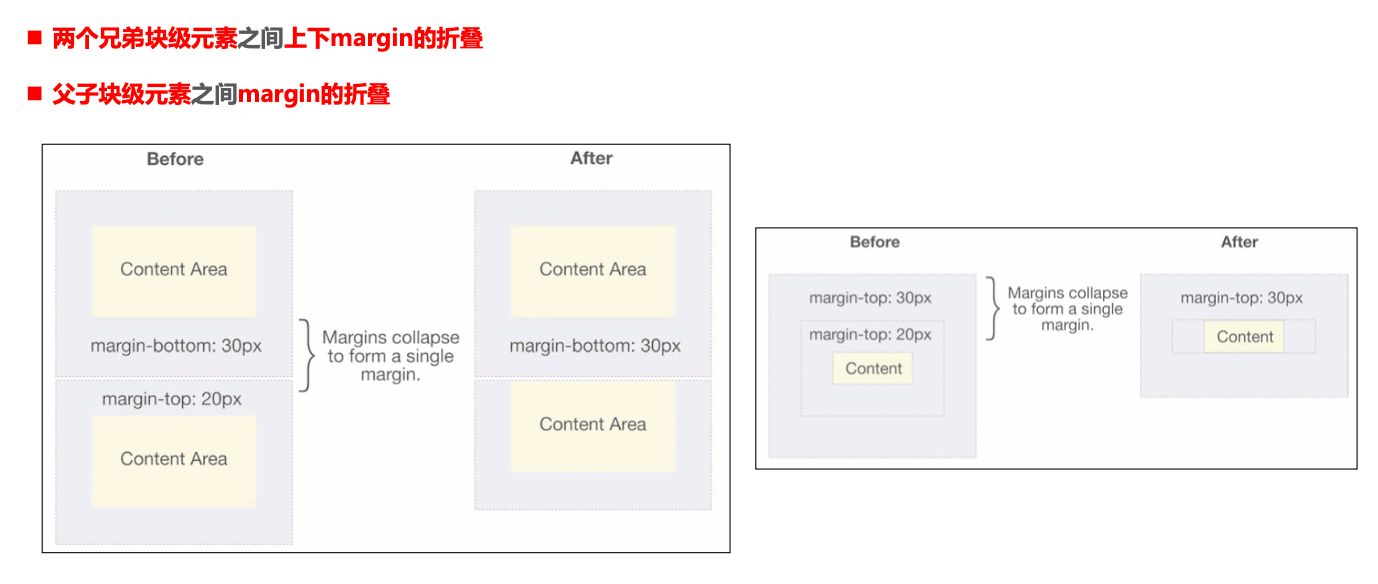
上下 margin 的传递
margin-top传递- 如果块级元素的顶部线和父元素的顶部线重叠,那么这个块级元素的
margin-top值会传递给父元素
- 如果块级元素的顶部线和父元素的顶部线重叠,那么这个块级元素的
margin-bottom传递- 如果块级元素的底部线和父元素的底部线重写,并且父元素的高度是
auto,那么这个块级元素的margin-bottom值会传递给父元素
- 如果块级元素的底部线和父元素的底部线重写,并且父元素的高度是
- 如何防止出现传递问题?
- 给父元素设置
padding-top\padding-bottom - 给父元素设置
border - 触发
BFC: 设置overflow为auto(Block formating context)
- 给父元素设置
- 建议
margin一般是用来设置兄弟元素之间的间距padding一般是用来设置父子元素之间的间距
上下margin的折叠
- 垂直方向上相邻的2个
margin(margin-top、margin-bottom)有可能会合并为1个margin,这种现象叫做collapse(折叠) - 水平方向上的
margin(margin-left、margin-right)永远不会collapse - 折叠后最终值的计算规则
- 两个值进行比较,取较大的值
- 如何防止
margin collapse?- 只设置其中一个元素的
margin
- 只设置其中一个元素的
上下margin折叠的情况
块级元素的居中
- 在一些需求中,需要元素在父元素中水平居中显示(父元素一般都是
块级元素、inline-block) - 行内级元素(包括
inline-block元素)- 水平居中:在父元素中设置
text-align: center
- 水平居中:在父元素中设置
- 块级元素
- 水平居中:
margin: 0 auto
- 水平居中:
1.2. outline
| * 外轮廓(很少会用到) | |
| ```css | |
| a, input { | |
| outline: none; | |
| } | |
| ``` |
outline表示元素的外轮廓不占用空间- 默认
显示在border的外面
outline相关属性有outline-width: 外轮廓的宽度outline-style:取值跟border的样式一样,比如solid、dotted等outline-color: 外轮廓的颜色outline:outline-width、outline-style、outline-color的简写属性,跟border用法类似
应用实例
去除a元素、input元素的focus轮廓效果
1.3. box-shadow
| box-shadow: offset-x offset-y blur-radius spread-radius color |
盒子阴影 – box-shadow
- **box-shadow **属性可以设置一个或者多个阴影
- 每个阴影用
<shadow>表示 - 多个阴影之间用逗号,隔开,从前到后叠加
- 每个阴影用
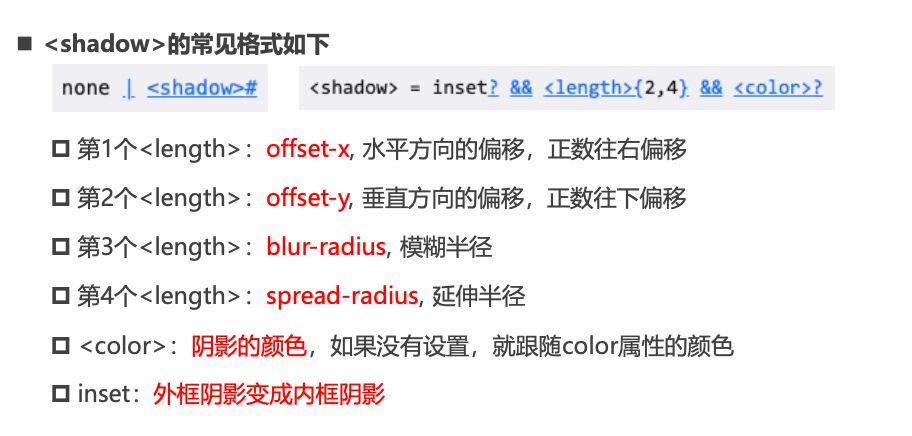
<shadow>的常见格式如下- 第1个
<length>:offset-x, 水平方向的偏移,正数往右偏移 - 第2个
<length>:offset-y, 垂直方向的偏移,正数往下偏移 - 第3个
<length>:blur-radius, 模糊半径 - 第4个
<length>:spread-radius, 延伸半径
- 第1个
<color>:阴影的颜色,如果没有设置,就跟随color属性的颜色inset:外框阴影变成内框阴影
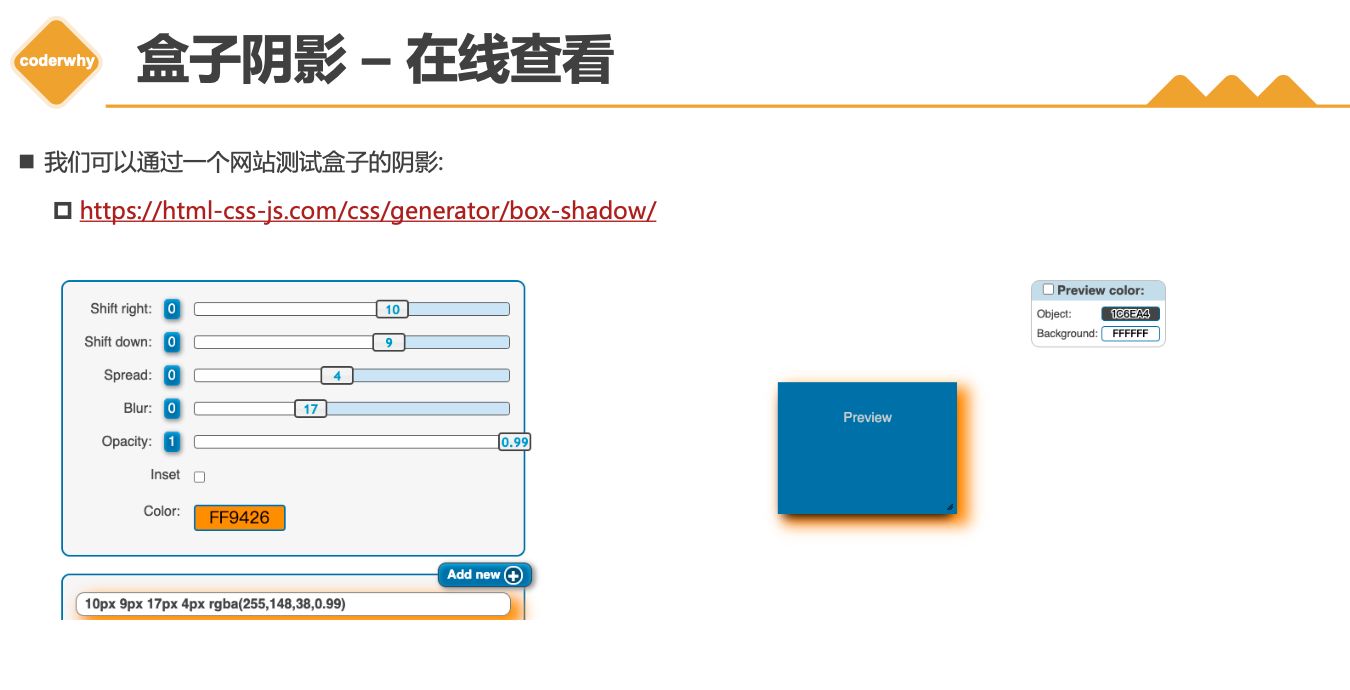
盒子阴影 – 在线查看
- 我们可以通过一个网站测试盒子的阴影:
1.4. text-shadow
| text-shadow: offset offset-y blur color; |
文字阴影 - text-shadow
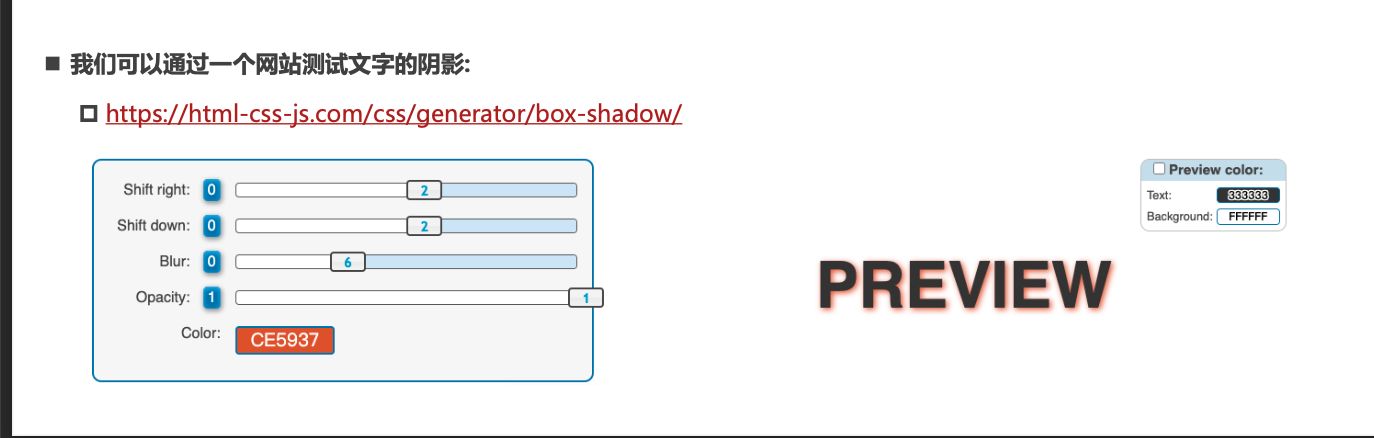
- text-shadow用法类似于
box-shadow,用于给文字添加阴影效果 <shadow>的常见格式如下(没有向内)

- 我们可以通过一个网站测试文字的阴影:
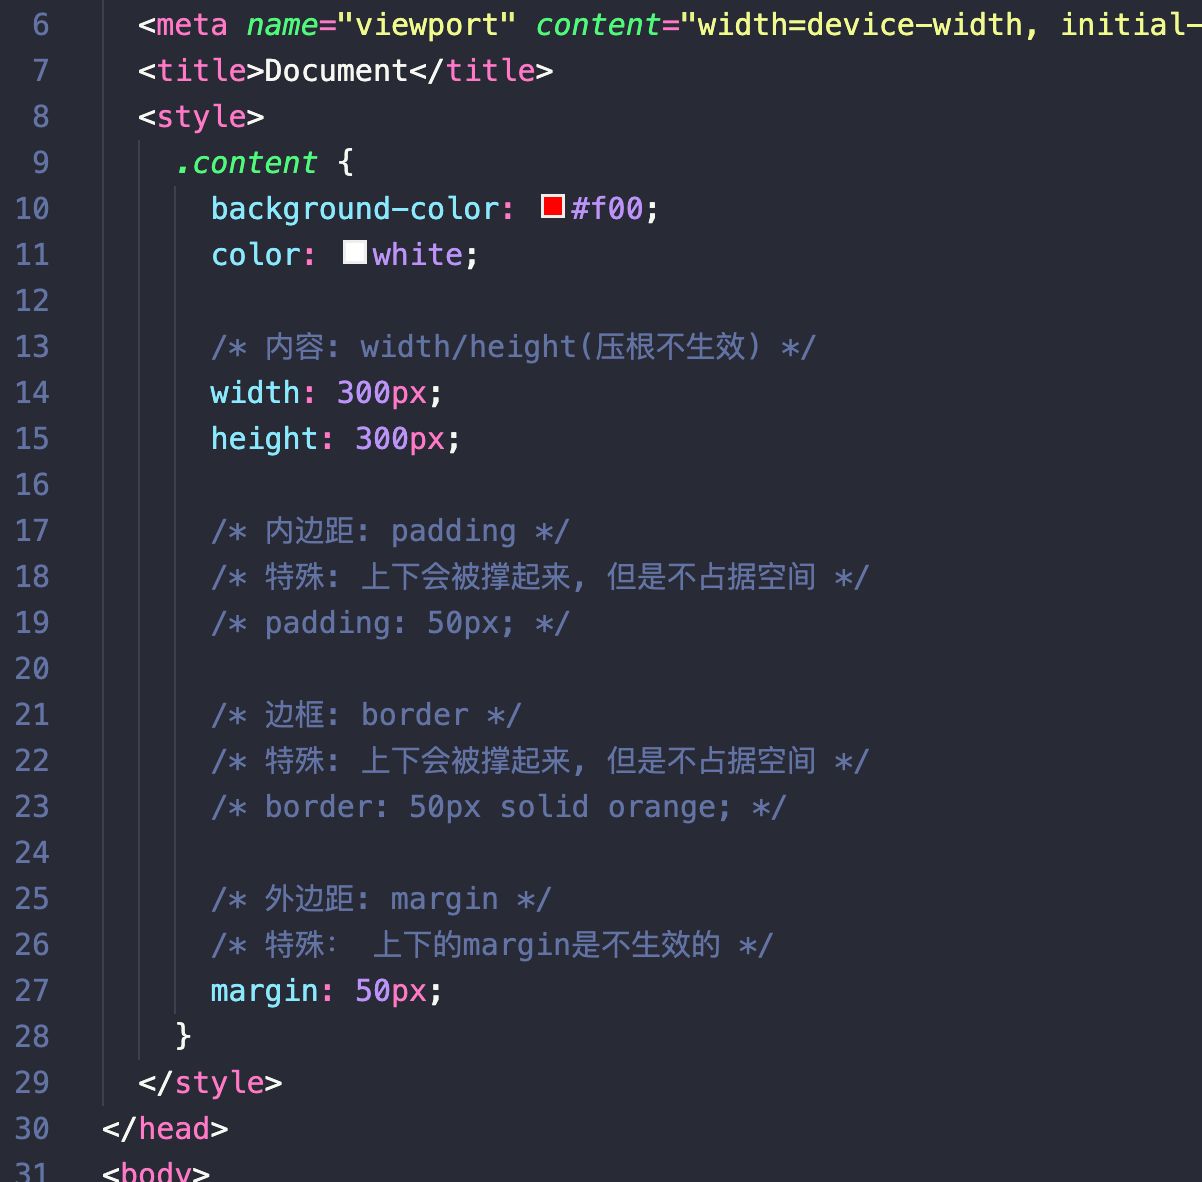
行内非替换元素的注意事项
- 以下属性对行内级非替换元素不起作用
width、height、margin-top、margin-bottom
- 以下属性对行内级非替换元素的效果比较特殊
padding-top、padding-bottom、上下方向的border
综合案例练习
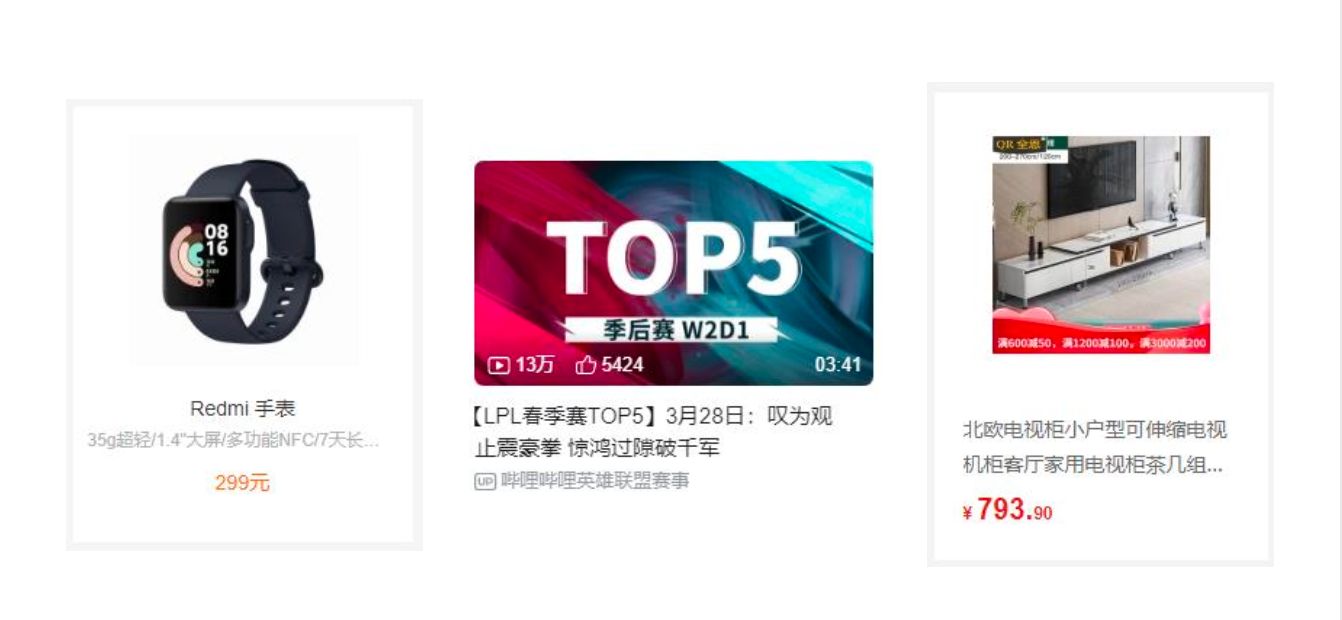
1.5. box-sizing
- content-box
- border-box(常用)
CSS属性 - box-sizing
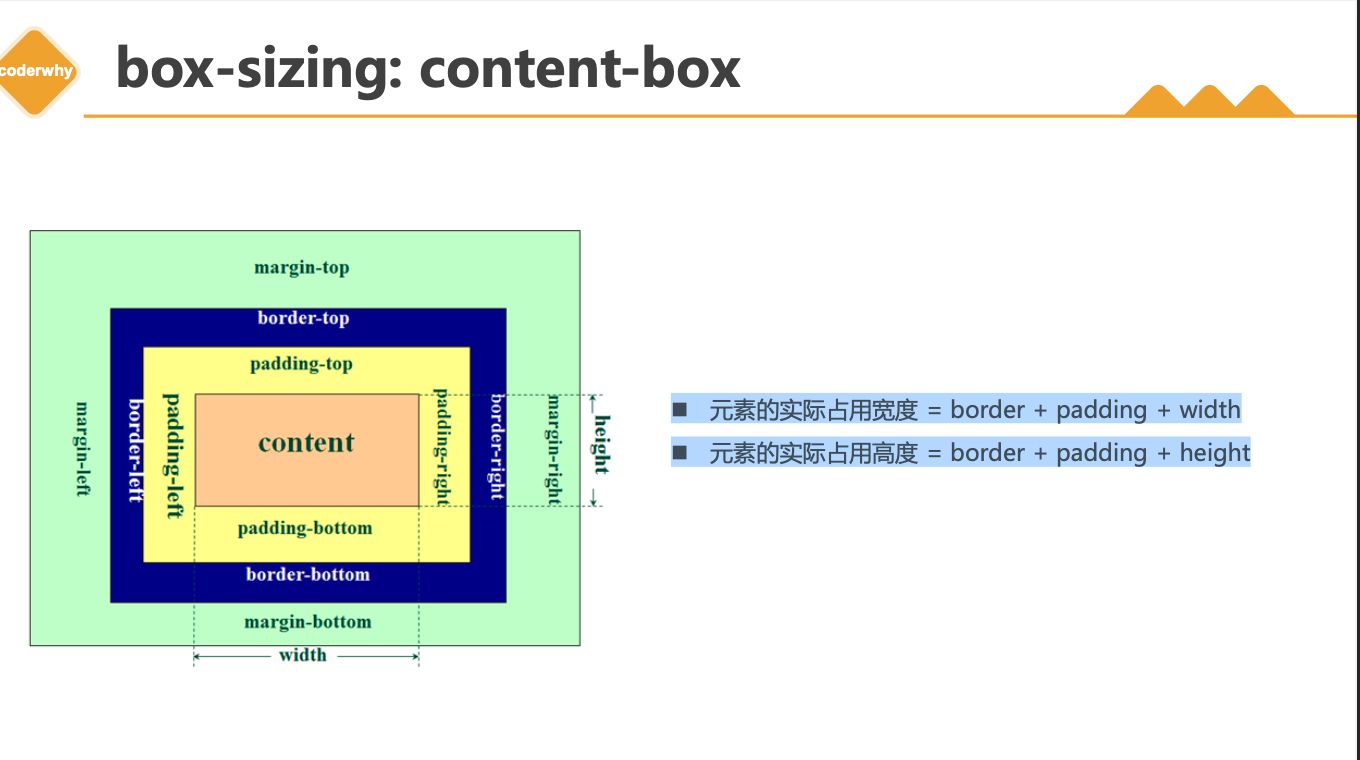
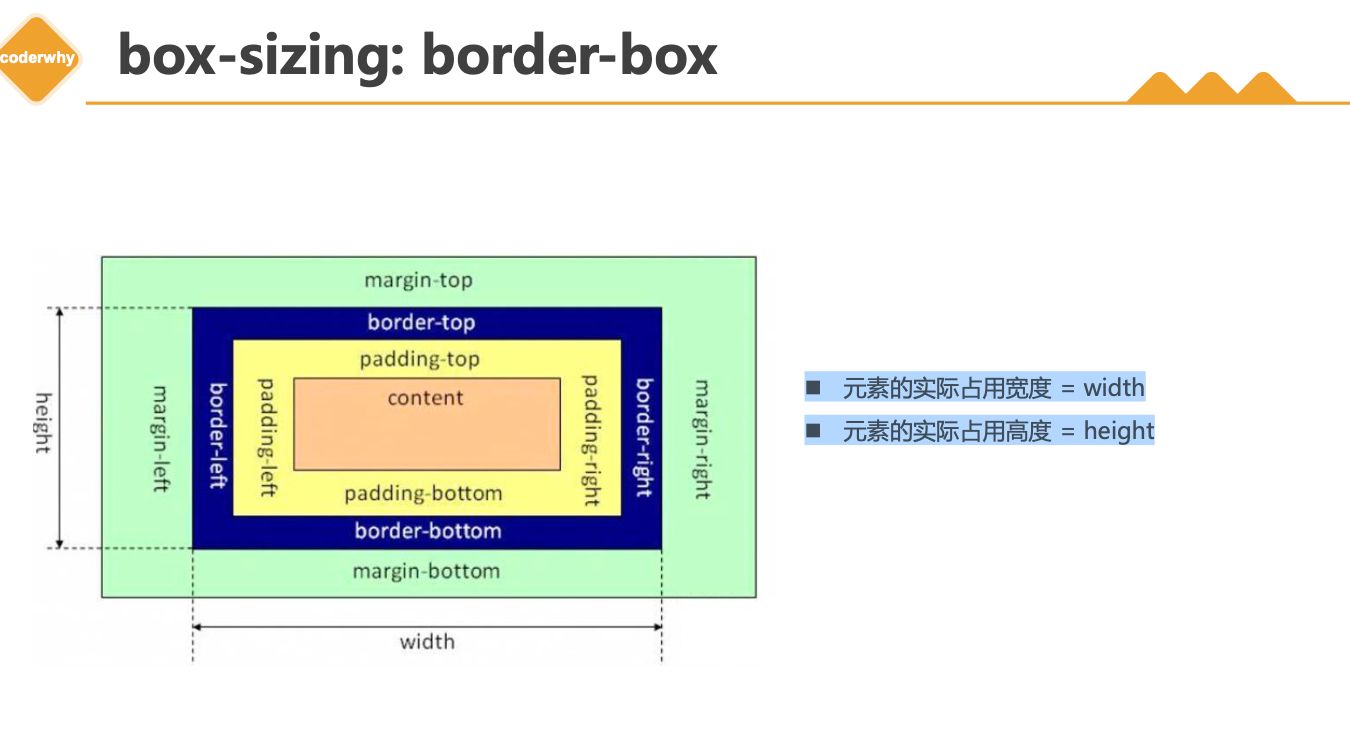
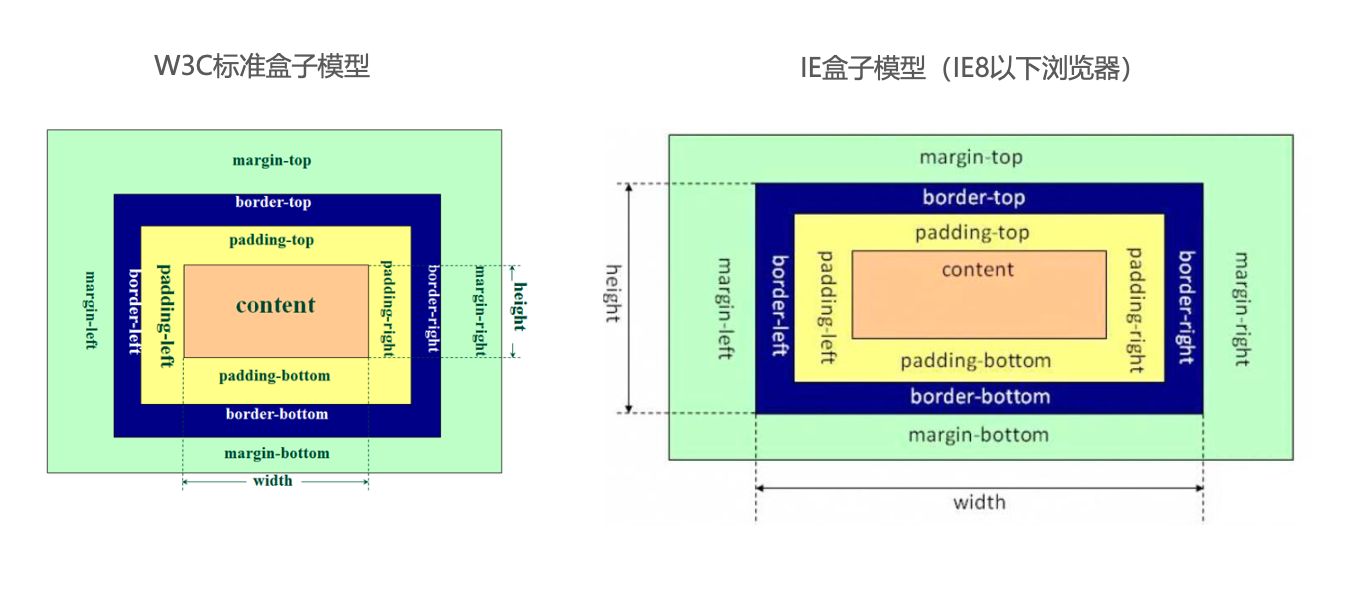
box-sizing用来设置盒子模型中宽高的行为content-boxpadding、border都布置在width、height外边
border-boxpadding、border都布置在width、height里边
box-sizing: content-box
元素的实际占用宽度=border + padding + width元素的实际占用高度=border + padding + height
box-sizing: border-box
元素的实际占用宽度=width元素的实际占用高度=height
IE盒子模型
1.6. 注意事项
| * width/height/margin-top/margin-bottom 对于行内非替换元素是无效的 | |
| * padding-top/bottom, border-top/bottom 对于行内非替换元素有特殊效果 |
1.7. 水平居中
| * 行内级元素 | |
| * text-align: center | |
| * 块级元素 有宽度 | |
| * margin: 0 auto; |
元素的水平居中方案
- 在一些需求中,需要元素在父元素中水平居中显示(父元素一般都是
块级元素、inline-block) - 行内级元素(包括
inline-block元素)- 水平居中:在父元素中设置
text-align: center
- 水平居中:在父元素中设置
- 块级元素
- 水平居中:
margin: 0 auto
- 水平居中:
二. 案例练习
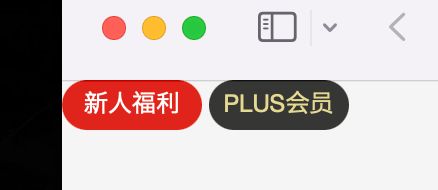
2.1. 京东小按钮
| <html lang="en"> | |
| <head> | |
| <meta charset="UTF-8"> | |
| <meta http-equiv="X-UA-Compatible" content="IE=edge"> | |
| <meta name="viewport" content="width=device-width, initial-scale=1.0"> | |
| <title>Document</title> | |
| <link rel="stylesheet" href="./css/reset.css"> | |
| <style> | |
| /* a样式 */ | |
| .btn { | |
| display: inline-block; | |
| width: 70px; | |
| height: 25px; | |
| /* 水平和垂直居中 */ | |
| line-height: 25px; | |
| text-align: center; | |
| border-radius: 13px; | |
| } | |
| .btn:hover { | |
| background-color: #c81623; | |
| color: #fff; | |
| } | |
| .new { | |
| background-color: #e1251b; | |
| color: #fff; | |
| } | |
| .vip { | |
| background-color: #363634; | |
| color: #e5d790; | |
| } | |
| </style> | |
| </head> | |
| <body> | |
| <!-- 新人福利 --> | |
| <a class="btn new" href="https://xinren.jd.com/?channel=99#/home" target="_blank">新人福利</a> | |
| <a class="btn vip" href="https://passport.jd.com/new/login.aspx" target="_blank">PLUS会员</a> | |
| </body> | |
| </html> |
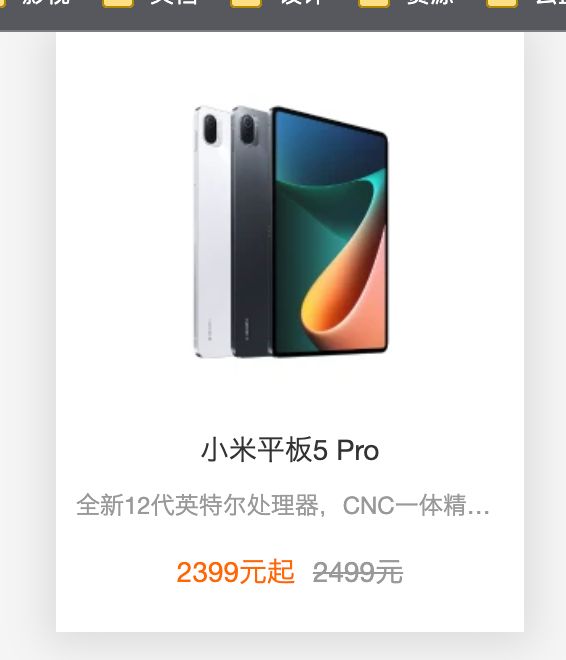
2.2. 小米的商品
| <html lang="en"> | |
| <head> | |
| <meta charset="UTF-8"> | |
| <meta http-equiv="X-UA-Compatible" content="IE=edge"> | |
| <meta name="viewport" content="width=device-width, initial-scale=1.0"> | |
| <title>Document</title> | |
| <link rel="stylesheet" href="./css/reset.css"> | |
| <link rel="stylesheet" href="./css/demo02.css"> | |
| <style> | |
| body { | |
| text-align: center; | |
| } | |
| </style> | |
| </head> | |
| <body> | |
| <a class="item" href="https://www.mi.com/xiaomipad5pro" target="_blank"> | |
| <img src="../images/xiaomi01.webp" alt=""> | |
| <h3 class="title">小米平板5 Pro</h3> | |
| <p class="desc"> | |
| 全新12代英特尔处理器,CNC一体精雕工艺,2.5K 120Hz高清屏,可选MX550独立显卡 | |
| </p> | |
| <div class="price"> | |
| <span class="new-price">2399元起</span> | |
| <span class="old-price">2499元</span> | |
| </div> | |
| </a> | |
| </body> | |
| </html> |
2.3. B站视频展示
| <html lang="en"> | |
| <head> | |
| <meta charset="UTF-8"> | |
| <meta http-equiv="X-UA-Compatible" content="IE=edge"> | |
| <meta name="viewport" content="width=device-width, initial-scale=1.0"> | |
| <title>Document</title> | |
| <link rel="stylesheet" href="./css/reset.css"> | |
| <style> | |
| a { | |
| display: block; | |
| } | |
| .item { | |
| width: 300px; | |
| margin: 0 auto; | |
| } | |
| .item .album img { | |
| width: 100%; | |
| border-radius: 8px; | |
| } | |
| .item .info p { | |
| font-size: 15px; | |
| margin-top: 8px; | |
| /* 显示一行 */ | |
| white-space: nowrap; | |
| overflow: hidden; | |
| text-overflow: ellipsis; | |
| /* display: -webkit-box; | |
| -webkit-line-clamp: 3; | |
| -webkit-box-orient: vertical; */ | |
| } | |
| .item .info .anchor { | |
| font-size: 13px; | |
| color: #888; | |
| margin-top: 5px; | |
| } | |
| .item .info .anchor::before { | |
| content: url(../images/widget-up.svg); | |
| display: inline-block; | |
| width: 16px; | |
| height: 16px; | |
| position: relative; | |
| top: 1px; | |
| } | |
| </style> | |
| </head> | |
| <body> | |
| <div class="item"> | |
| <div class="album"> | |
| <a href="#"> | |
| <img src="https://i0.hdslb.com/bfs/archive/9c763bf06b7765462eac62cc0a9a34b260d3f9c8.jpg@672w_378h_1c.webp" referrerpolicy="no-referrer" alt=""> | |
| </a> | |
| </div> | |
| <div class="info"> | |
| <a href="#"> | |
| <p>萌化了!谁会不喜欢毛茸茸的小懒懒呢?萌化了!谁会不喜欢毛茸茸的小懒懒呢?萌化了!谁会不喜欢毛茸茸的小懒懒呢?萌化了!谁会不喜欢毛茸茸的小懒懒呢?</p> | |
| </a> | |
| <a class="anchor" href="#"> | |
| <span class="nickname">Muxi慕喜咩</span> | |
| <span class="time">3-20</span> | |
| </a> | |
| </div> | |
| </div> | |
| </body> | |
| </html> |
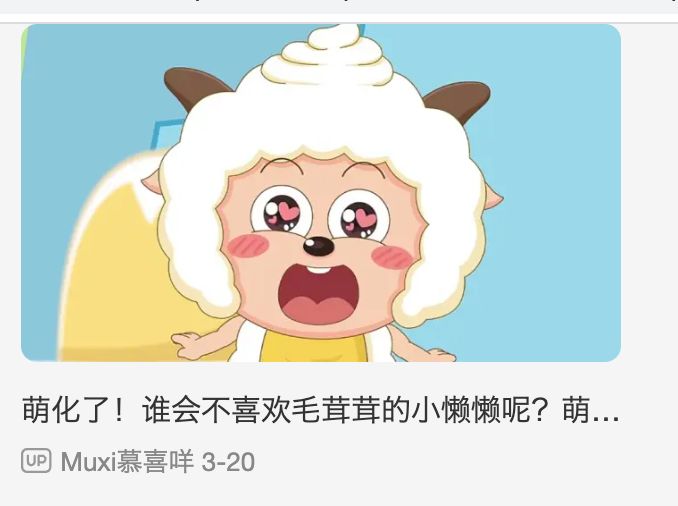
| 显示省略号 | |
| /* 显示一行 */ | |
| white-space: nowrap; | |
| overflow: hidden; | |
| text-overflow: ellipsis; | |
| /* | |
| display: -webkit-box; | |
| -webkit-line-clamp: 3; | |
| -webkit-box-orient: vertical; | |
| */ |
三. 背景设置
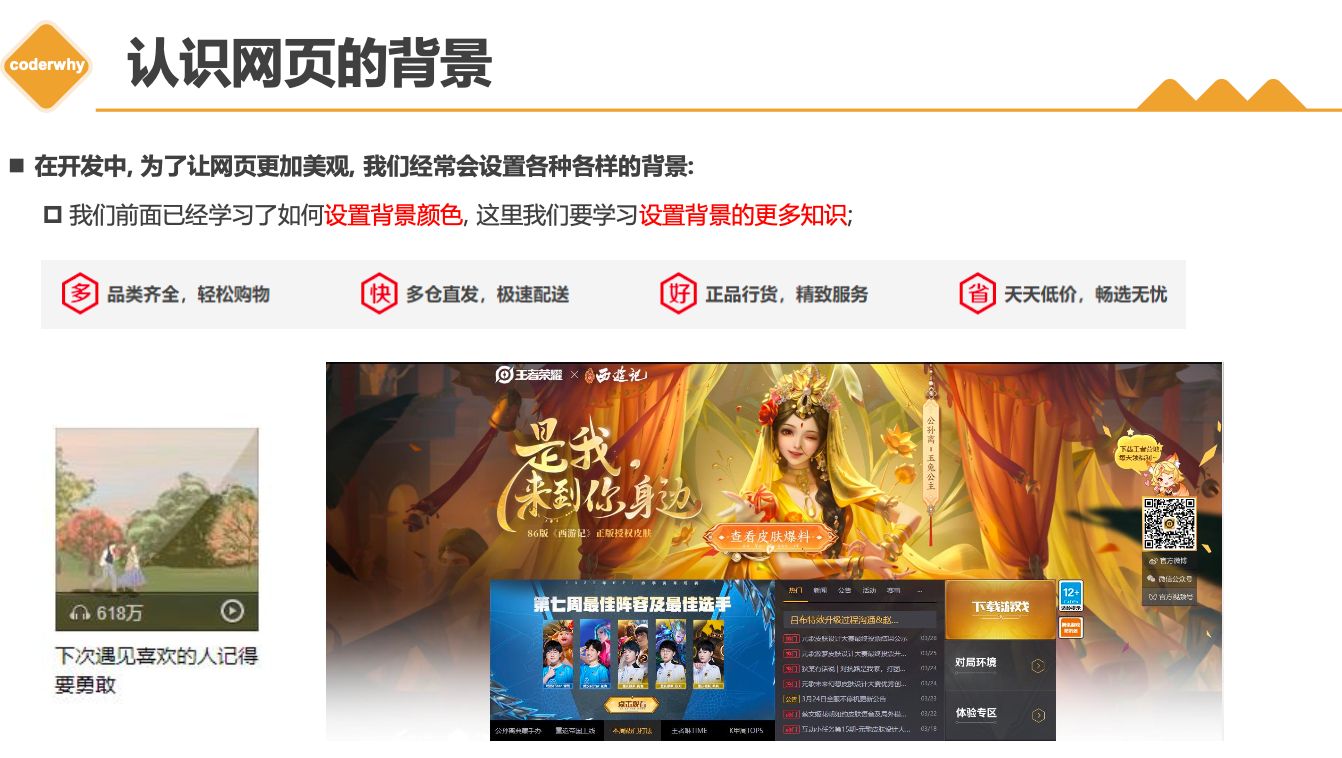
3.1. background-image
background-image用于设置元素的背景图片- 会盖在(不是覆盖)
background-color的上面
- 会盖在(不是覆盖)
如果设置了多张图片
- 设置的第一张图片将显示在最上面,其他图片按顺序层叠在下面
注意:如果设置了背景图片后,元素没有具体的宽高,背景图片是不会显示出来的
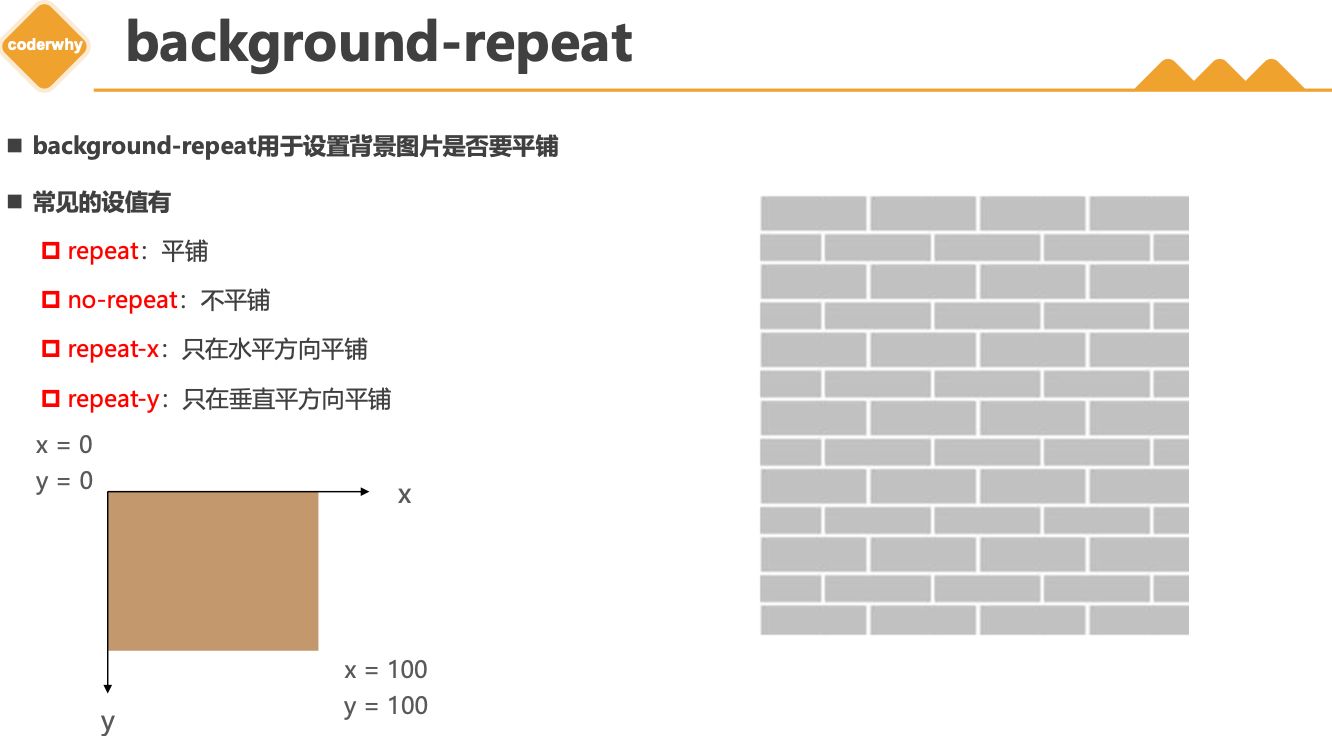
3.2. background-repeat
background-repeat用于设置背景图片是否要平铺- 常见的设值有
repeat:平铺no-repeat:不平铺repeat-x:只在水平方向平铺repeat-y:只在垂直平方向平铺
3.3. background-size
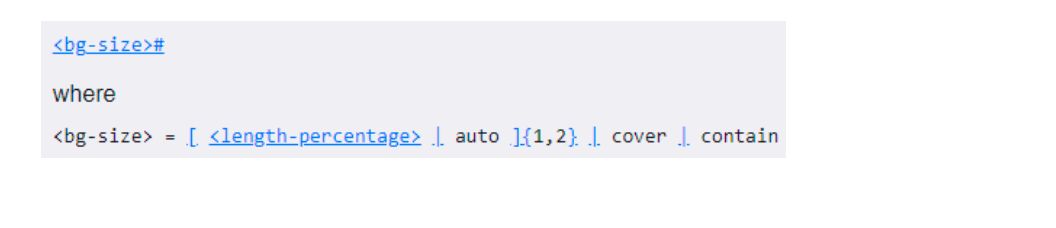
background-size用于设置背景图片的大小auto:默认值, 以背景图本身大小显示cover:缩放背景图,以完全覆盖铺满元素,可能背景图片部分看不见contain:缩放背景图,宽度或者高度铺满元素,但是图片保持宽高比<percentage>:百分比,相对于背景区(background positioning area)length:具体的大小,比如100px
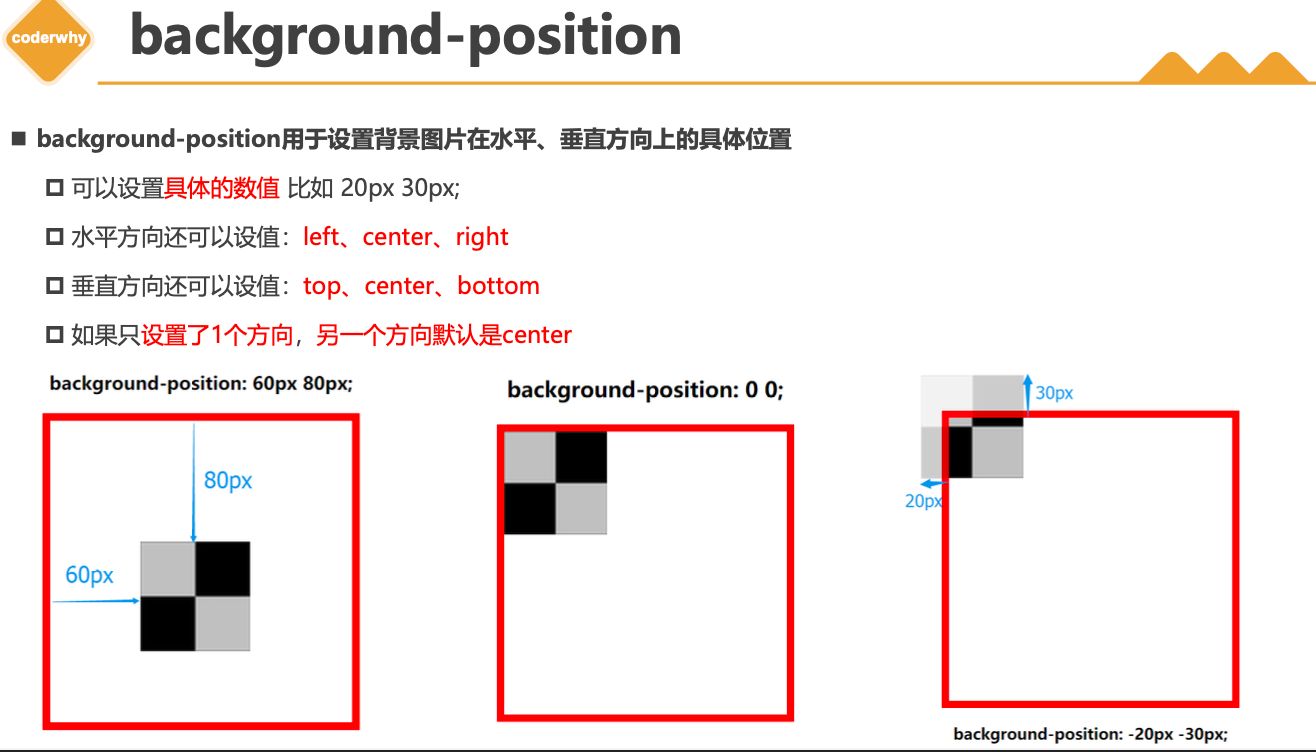
3.4. background-position
background-position用于设置背景图片在水平、垂直方向上的具体位置- 可以设置
具体的数值比如 20px 30px; - 水平方向还可以设值:
left、center、right - 垂直方向还可以设值:
top、center、bottom - 如果只
设置了1个方向,另一个方向默认是center
- 可以设置
3.5. background-attachment
background-attachment决定背景图像的位置是在视口内固定,或者随着包含它的区块滚动。- 可以设置以下3个值
scroll:此关键属性值表示背景相对于元素本身固定, 而不是随着它的内容滚动local:此关键属性值表示背景相对于元素的内容固定。如果一个元素拥有滚动机制,背景将会随着元素的内容滚动.fixed:此关键属性值表示背景相对于视口固定。即使一个元素拥有滚动机制,背景也不会随着元素的内容滚动。
3.6. background
background是一系列背景相关属性的简写属性
- 常用格式是
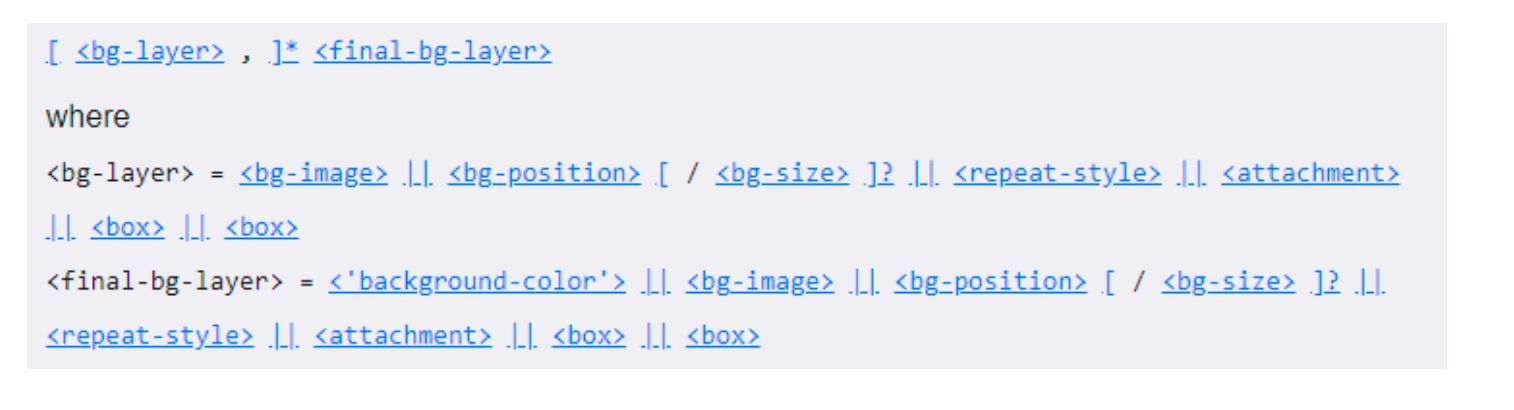
background-size可以省略,如果不省略,/background-size必须紧跟在background-position的后面其他属性也都可以省略,而且顺序任意
3.7. background-image和img区别和选择
- 利用
background-image和img都能够实现显示图片的需求,在开发中该如何选择?
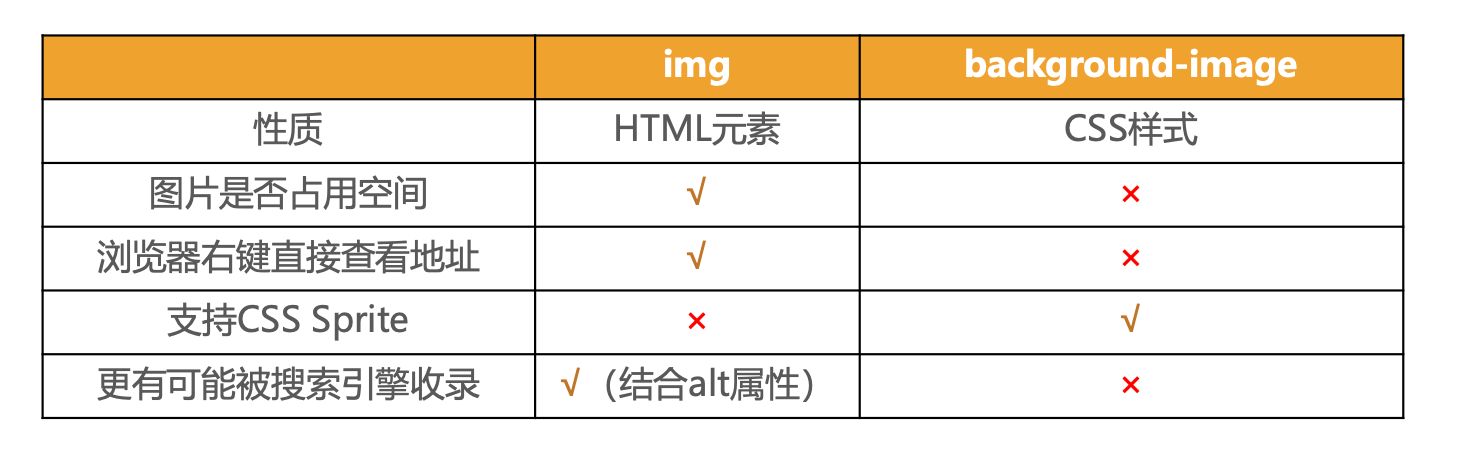
- 总结
img,作为网页内容的重要组成部分,比如广告图片、LOGO图片、文章配图、产品图片background-image,可有可无。有,能让网页更加美观。无,也不影响用户获取完整的网页内容信息